

In the world of strength and conditioning, few things have the versatility of a sandbag. Traditional weights like dumbbells, barbells, and kettlebells work great, but you’ll always need to be careful about dropping them…and you can forget throwing them around. If you want to train for power with a variety of throwing drills, medicine balls will certainly fit the bill if you can afford to grab all the sizes and varieties that you need. If you’re looking for the complete package at a price tag you can actually afford, sandbags are exactly what you need.
If you’re looking for the complete package at a price tag you can actually afford, sandbags are exactly what you need.
For the last year I was in college, I actually stopped going to the gym. I canceled my 24-hour gym membership and even completely stopped going to the free student gym on campus. I trained in my backyard with an 80-pound sandbag, a sled made from an old tire, and an adjustable dumbbell. Despite the lack of equipment, I hadn’t been in that condition since high school football. While I really liked the sled and the dumbbell, it was the sandbag that really pushed everything over the top.
Sandbag Training Benefits
- Great for training strength/metabolic hybrid workouts
- Constantly shifting weight increases the difficulty
- Can be thrown, tossed, slammed, or used like a traditional weight
- Amazing total body training tool
- Compact size means it won’t take up a ton of space in your home gym
- Excellent for grip strengthening
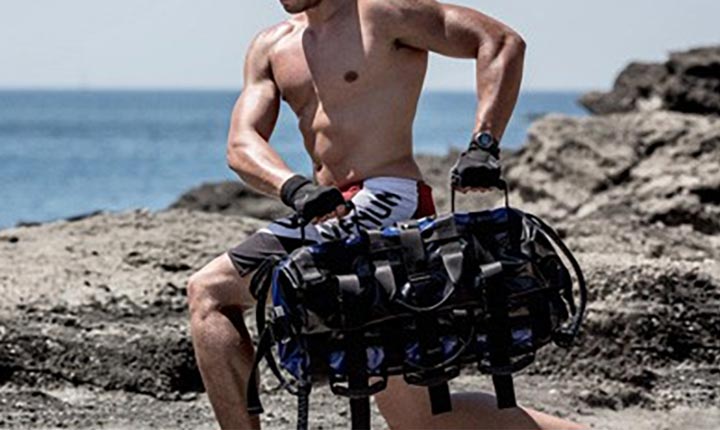
Just look at the variety of ways the Starz cast of Spartacus uses their sandbags in their training for the final season. In the video, you’ll see them doing cleans, step-ups, overhead toss and catch, and farmer’s carries. Try doing all those movements with a barbell or traditional weight and you’re probably going to end up missing a couple teeth.
Buying or Making Your Own Sandbag
Making your own is simple. You’re not going to have all the fun handles that you would from a commercially produced product, but it still works great. Opening that pickle jar will never be a problem again after using a sandbag with no handles. Look for military duffel bags on eBay or a local military surplus store. These are good, strong bags that you can usually pick up for $20 or less.
Once you have that, go grab some construction grade trash bags and playground sand. Add however much sand you want for weight into the trash bag and tie it off. I usually double up the bags on mine to help protect against getting sand leaking everywhere if the bag should happen to break. Try to press all the air out of the bag before you tie it off and don’t suck the knot down tight against the sand. You want it to be able to move freely in the bag. Once that’s done, just toss it in your duffel bag, duct tape the end shut, and you’re ready to train!
If you’re buying one, you have a ton of options depending on the level of abuse it’s going to take as well as the weight that you need. For lighter use and weight, the SKILZ brand is a decent price and quality. It’s not one I would recommend slamming or doing a bunch of throwing with, however. What we’re currently using in our gym are the bags from Fringe Sports. GetRx’d also has had some good reviews on their sandbags. Keep in mind that when you’re buying a bag, that price is usually just for the outer shell. If you want the filler bags, it will cost extra. You can either use the trash bag method or buy the filler bags. Either way, you’re going to have to buy the playground sand to fill it. If you do grab the filler bags, don’t fill them completely full. I would stop at about 75 percent so that the sand can move and shift. This will also help prevent the filler bags from rupturing.
At some point, your filler bags will break. It doesn’t matter if they’re homemade or commercial. They’ll break.
At some point, your filler bags will break. It doesn’t matter if they’re homemade or commercial. They’ll break. So will the outer shell. The more you slam it and throw it, the faster it will break down. This is why I recommend not going cheap when grabbing or making a bag. Sure, you can just toss some stuff in a duffel bag for a short-term fix (which works well when you’re in a pinch), but it’s going to be fragile at best.
Let’s get down to the nitty gritty. You have a sandbag—so now what the hell do you do with it? First, let’s lay some ground rules. Technique absolutely does matter. Just because it’s not a traditional weight doesn’t mean you can use horrible form and walk away unscathed. The basics are the basics. Try to maintain a neutral spine, use your legs to lift instead of your lower back, keep the stomach braced. If you can do those, you should be fine.
Driven SB Complex
Perform all the reps of each exercise without letting go of the sandbag. Once completed, rest of 60 seconds and go again. Complete 5 rounds.
- Rotating Deadlift x 5+5
- High Pull x 5
- Bent Over Row x 10
- Clean + Front Squat + Push Press x 5
https://www.youtube.com/watch?v=3Kqz2f8VKKY
The exercises I used for that complex are simply the ones I like and use frequently. Feel free to experiment and find the ones you really like. Sandbags can be pressed, pulled, carried, squatted, deadlifted, or thrown in any way you can imagine. Here are a few to get your juices flowing.
https://www.youtube.com/watch?v=CVcxC7JjLLo
There is no one perfect way to train with sandbags. For strength training, you can train with straight sets just like you would with traditional weights. Supersets, complexes, circuits, density training, tabatas, or whatever style of training you prefer can be done using sandbags. Get creative and get to work!
About the Author: Trey Potter
Related Posts


« How to Exit and Retire Your Small Business in Style Small Batch Bourbon—Yachting with the Colonel »


